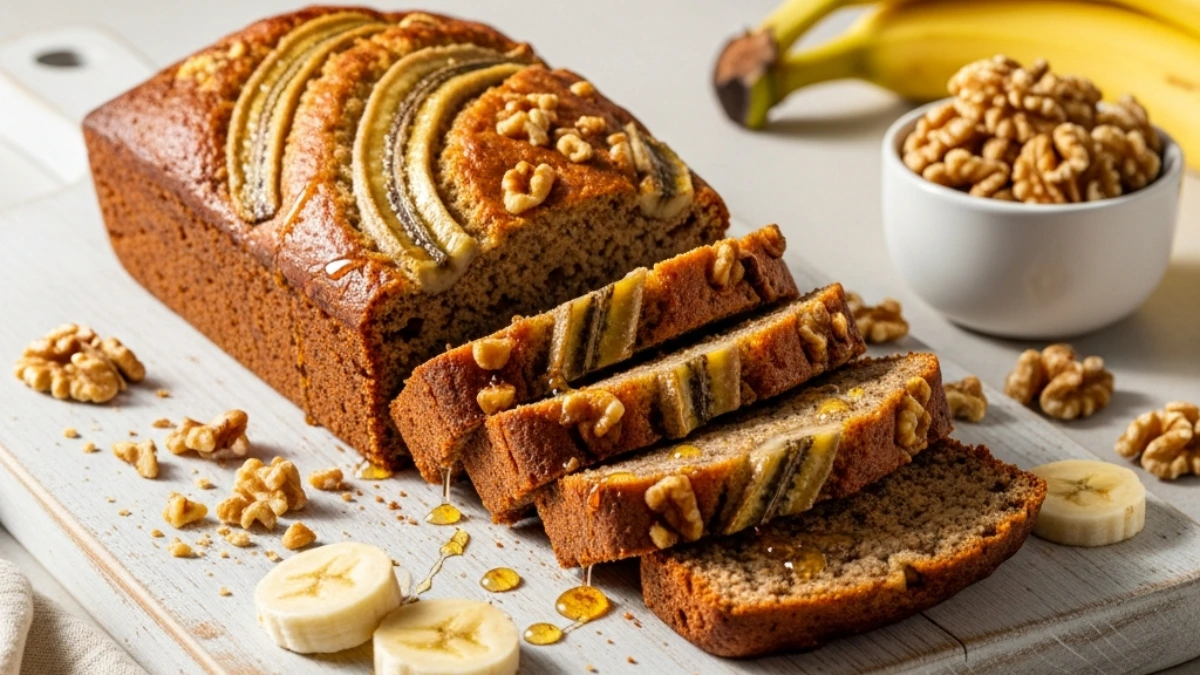
This banana nut bread recipe from the United States transforms overripe bananas into the most incredible, moist loaf you’ve ever tasted.
You know those brown-spotted bananas sitting on your counter?
The ones you keep meaning to use but they just keep getting darker?
Stop feeling guilty about them. They’re about to become your new favorite breakfast, snack, and “I can’t believe I made this” moment.
I’m talking about banana bread that stays ridiculously moist for days, has actual banana flavor (not just sugar), and features perfectly toasted walnuts that add this incredible crunch in every bite.
This isn’t another banana nut bread recipe that tastes amazing on day one and turns into a dry brick by day two. This one gets better as it sits because the flavors meld together into something truly special.
The secret? Three simple things that most recipes skip: toasting your walnuts first, using bananas that look like they belong in the trash, and knowing exactly when to stop mixing.
I started making this on repeat after my first loaf disappeared in under 24 hours. My husband kept sneaking slices, my neighbor asked if I’d make her one, and suddenly I became the banana bread person in our building.
Here’s what makes this banana nut bread recipe different:
The texture is spot-on. Not too dense, not too cake-like. Just this perfect, tender crumb that holds together when you slice it but melts in your mouth.
The banana flavor shines through. Some recipes try to mask it with cinnamon overload or vanilla bombs. This one lets the fruit be the star while supporting it with just enough warmth from spices.
And it’s flexible. Want chocolate chips? Toss them in. Prefer pecans? Go ahead. Need it dairy-free? I’ve got you covered with swaps that actually work.
Let me show you exactly how to make the best banana nut bread of your life.
What You’ll Need
Main Ingredients
| Ingredient | Amount | Notes |
|---|---|---|
| Very ripe bananas | 3 large | The blacker the spots, the better |
| Melted butter | ⅓ cup | Can substitute with coconut oil |
| Granulated sugar | ¾ cup | Or use brown sugar for deeper flavor |
| Egg | 1 large, beaten | Room temperature works best |
| Vanilla extract | 1 teaspoon | Pure vanilla recommended |
| Baking soda | 1 teaspoon | Not baking powder! |
| Salt | Pinch | Enhances all flavors |
| All-purpose flour | 1½ cups | Spoon and level for accuracy |
| Ground cinnamon | 1 teaspoon | Freshly ground is amazing |
| Walnuts | 1 cup, chopped | Toast them first for best flavor |

Essential Tools
- 9×5 inch loaf pan (standard size, not mini)
- Two mixing bowls (one large, one medium)
- Fork or potato masher (for bananas)
- Whisk (for wet ingredients)
- Rubber spatula (prevents overmixing)
- Measuring cups and spoons (accurate measurements matter)
- Cooling rack (prevents soggy bottoms)
- Parchment paper (optional but makes life easier)
Pro Tips From My Kitchen
Toast those walnuts before anything else.
Seriously, this one step transforms the entire loaf. Five minutes in a 350°F oven brings out this deep, buttery, almost caramel-like flavor that raw nuts just can’t touch. It’s the difference between people saying “this is good” and “wait, what’s your secret?”
Your bananas should look scary.
I mean it. If you’d feel embarrassed buying them at the store, they’re perfect for this banana nut bread recipe. Those black spots aren’t a problem, they’re concentrated sweetness. The riper the banana, the sweeter and more flavorful your bread becomes. Yellow bananas with just a few brown spots? Let them sit on the counter for another 3-4 days.
Stop mixing the second you can’t see dry flour.
This is where most people mess up their banana bread. Overmixing develops gluten, which makes your loaf tough and chewy instead of tender and fluffy. When you add the flour, fold it in gently with a spatula until the last streaks of white disappear, then immediately stop. A few small lumps are completely fine and will bake out.
Room temperature ingredients blend better.
Your egg should be out of the fridge for about 30 minutes before you start. Your melted butter should be warm enough to pour but cool enough to touch without burning yourself. This prevents the butter from solidifying when it hits cold eggs, which creates lumps you can’t mix out.
Every oven lies about its temperature.
Start checking your bread at 50 minutes, not 60. Stick a toothpick in the center. If it comes out clean or with just a few moist crumbs clinging to it, you’re done. If it comes out wet with actual batter, give it another 5-10 minutes and check again. Overbaking is the number one reason banana bread turns out dry.
Chef’s Secret: The best banana nut bread comes from bananas you’d otherwise throw away. Don’t waste money on special “banana bread bananas” at the store. Just wait for your regular bananas to get super spotty and use those.
Substitutions and Variations
Nut Options
| Instead of Walnuts | Use This | Flavor Profile |
|---|---|---|
| Pecans | 1 cup chopped | Buttery, slightly sweet |
| Almonds | 1 cup sliced | Mild, delicate crunch |
| Hazelnuts | 1 cup chopped | Rich, almost chocolate-like |
| Macadamia | ¾ cup chopped | Creamy, tropical |
| No nuts | Omit entirely | Perfect for allergies |
Sweetener Swaps
Brown sugar instead of white creates a deeper, molasses-like sweetness that’s absolutely incredible. Use the same amount (¾ cup).
Coconut sugar works great for a less processed option. The bread will be darker in color but tastes amazing.
Honey or maple syrup can replace half the sugar (use ⅓ cup liquid sweetener + ⅓ cup sugar). Reduce the butter by 1 tablespoon to compensate for extra liquid.
Flour Alternatives
Whole wheat flour can replace up to half the all-purpose flour. Your bread will be denser and heartier, with more fiber.
Gluten-free bakers should use a 1:1 baking blend (like Bob’s Red Mill). The texture will be slightly different but still delicious.
Almond flour for paleo baking requires about 2 cups since it’s denser. The bread will be more moist and have a different texture.
Fun Add-Ins for Your Banana Nut Bread Recipe
- Chocolate chips (½ cup) turn this into dessert territory 🍫
- Dried cranberries (½ cup) add chewy tartness
- Shredded coconut (¼ cup) gives tropical vibes
- Peanut butter swirl (2 tablespoons swirled in before baking)
- Nutella swirl (2 tablespoons for chocolate hazelnut heaven)
- Blueberries (¾ cup fresh or frozen) for fruity goodness
Spice It Up
Add ¼ teaspoon nutmeg for warm, cozy flavor.
Try a pinch of cardamom for something different and sophisticated.
Swap half the cinnamon for pumpkin pie spice during fall.
Make-Ahead Tips
This banana nut bread recipe actually improves overnight.
The flavors meld together, the texture becomes even more moist, and slicing is way cleaner after the loaf has fully cooled and rested.
Night-before prep: Mix your dry ingredients (flour, cinnamon, baking soda, salt) in a bowl and cover. Toast your walnuts and store in an airtight container. In the morning, just mash bananas, mix wet ingredients, combine everything, and bake.
Freeze the batter: Pour the mixed batter into your loaf pan, wrap it tightly in plastic wrap and then aluminum foil. Freeze for up to 1 month. When ready to bake, thaw overnight in the fridge, then bake as directed (add about 5-10 extra minutes since it’ll be cold).
Freeze ripe bananas: Peel them first, put in a freezer bag, and freeze for up to 3 months. When you’re ready to bake, thaw them completely (they’ll be mushy, which is perfect), drain excess liquid, and use as normal.
Bake and freeze: Make the full loaf, let it cool completely, wrap tightly in plastic wrap and then foil, and freeze for up to 3 months. Thaw on the counter for 2-3 hours or overnight in the fridge.
How to Make the Perfect Banana Nut Bread
Step 1: Prep Your Oven and Pan
Preheat your oven to 350°F.
Grease your 9×5 inch loaf pan generously with butter or cooking spray. For even easier removal, line the bottom and sides with parchment paper, leaving some overhang on the sides to use as handles later.
Step 2: Toast Those Walnuts
Spread your chopped walnuts on a baking sheet in a single layer.
Pop them in the preheating oven for 5 minutes until they smell amazing and turn slightly darker. Watch them carefully after 3 minutes because they can go from perfect to burnt quickly.
Remove and set aside to cool. This step is non-negotiable for the best banana nut bread recipe.
Step 3: Mash Your Bananas
In your large mixing bowl, mash those super-ripe bananas with a fork or potato masher.
You want them mostly smooth with just a few small chunks for texture. Don’t stress about making it completely lump-free. Those little pieces of banana throughout the bread are actually really nice.
Step 4: Add the Wet Ingredients
Pour the melted butter into your mashed bananas and mix until combined.
Add the sugar, beaten egg, and vanilla extract. Whisk everything together vigorously for about 30 seconds until it’s well blended and slightly lighter in color.
Step 5: Add Baking Soda and Salt
Sprinkle the baking soda and salt directly over your banana mixture.
Stir it in gently. You might see it fizz a little when the baking soda hits the acidic bananas. That’s exactly what you want.
Step 6: Fold in the Dry Ingredients
Add the flour and cinnamon all at once.
Here’s where you need to be gentle. Switch to a rubber spatula and fold the flour into the wet mixture with slow, deliberate strokes. Scrape from the bottom of the bowl and fold over the top.
Stop mixing the moment you can’t see dry flour anymore. The batter should look a little lumpy and thick. This takes maybe 15-20 gentle folds. No more.
Important: Overmixing is the enemy of tender banana bread. Mix until just combined, then stop immediately.
Step 7: Add the Walnuts
Fold in your toasted walnuts with just 3-4 gentle strokes to distribute them evenly.
Don’t overmix here either. You want them throughout the batter but you don’t want to activate more gluten by stirring too much.
Step 8: Transfer to Pan
Pour the batter into your prepared loaf pan.
Use your spatula to smooth the top so it’s relatively even. Give the pan a gentle tap on the counter to release any air bubbles.
Step 9: Bake
Place the pan in the center of your oven.
Bake for 50-60 minutes. At the 50-minute mark, insert a toothpick into the center of the loaf. If it comes out clean or with a few moist crumbs, it’s done. If there’s wet batter on it, bake for another 5-10 minutes.
The top should be golden brown and may crack down the middle (that’s normal and beautiful).
Step 10: Cool Properly
Let the banana bread cool in the pan for 10 minutes on a cooling rack.
This allows it to set up enough that it won’t fall apart when you remove it.
After 10 minutes, run a knife around the edges if needed, then lift the bread out using the parchment paper overhang (if you used it) or invert the pan onto the cooling rack.
Let it cool completely before slicing. This is torture, I know, but warm banana bread falls apart and squishes when you try to slice it. Give it at least 30 minutes, ideally an hour.
Leftovers and Storage
Room Temperature (Best for 2-3 Days)
Wrap the cooled loaf tightly in plastic wrap or aluminum foil.
Keep it on your counter away from direct sunlight. It’ll stay perfectly moist and delicious for 2-3 days this way.
Don’t refrigerate unless you absolutely have to. The fridge dries out baked goods faster than room temperature storage.
Refrigerator Storage (Up to 1 Week)
If you live somewhere hot and humid, or you just want to extend the life, refrigerate it.
Wrap tightly in plastic wrap, then place in a zip-top bag to prevent it from absorbing fridge odors.
Before eating refrigerated slices, warm them in the microwave for 10-15 seconds to bring back that just-baked texture.
Freezer Storage (Up to 3 Months)
For long-term storage, freezing is your best friend.
Whole loaf: Wrap the completely cooled bread tightly in plastic wrap, then wrap again in aluminum foil. Label with the date. Freeze for up to 3 months.
Individual slices: Slice the bread, wrap each slice in plastic wrap, then place all wrapped slices in a freezer bag. This way you can grab just one or two slices at a time for quick breakfasts.
Thawing: For the whole loaf, thaw overnight in the fridge or on the counter for 2-3 hours. For individual slices, microwave for 20-30 seconds from frozen or let sit at room temperature for 15 minutes.
Storage Comparison Table
| Storage Method | Duration | Best For | Texture Retention |
|---|---|---|---|
| Counter (wrapped) | 2-3 days | Immediate consumption | Excellent |
| Refrigerator | Up to 1 week | Hot/humid climates | Good (warm before eating) |
| Freezer (whole) | Up to 3 months | Meal prep | Excellent when thawed |
| Freezer (slices) | Up to 3 months | Grab-and-go breakfasts | Excellent when thawed |
Additional Details You’ll Want to Know
Nutritional Breakdown
Here’s what you’re getting per slice when you cut this loaf into 12 pieces:
| Nutrient | Amount Per Slice |
|---|---|
| Calories | 215 |
| Total Fat | 9g |
| Saturated Fat | 3g |
| Cholesterol | 30mg |
| Sodium | 155mg |
| Total Carbohydrates | 31g |
| Dietary Fiber | 2g |
| Sugars | 15g |
| Protein | 4g |
Note: These are approximate values and will vary based on specific brands and any substitutions you make.
Dietary Modifications That Actually Work
Vegan Banana Nut Bread Recipe:
- Replace the egg with a flax egg (1 tablespoon ground flaxseed + 3 tablespoons water, let sit 5 minutes)
- Use vegan butter or coconut oil instead of regular butter
- Everything else stays the same
Dairy-Free:
- Swap butter for coconut oil or any neutral vegetable oil
- That’s literally it. This recipe is almost dairy-free already.
Lower Sugar:
- Reduce sugar to ½ cup (I’ve done this many times)
- The ripe bananas provide plenty of natural sweetness
- The bread won’t be as sweet but it’s still really good
Paleo:
- Use 2 cups almond flour instead of all-purpose flour
- Use coconut sugar instead of white sugar
- Use coconut oil instead of butter
- Note: Texture will be denser and more moist
Keto-Friendly: This recipe isn’t naturally keto, but you can adapt it by using almond flour, a sugar substitute like erythritol, and increasing the eggs. The banana is tough to replace in keto baking, so results will vary significantly.
Perfect Pairings for Your Banana Nut Bread
This bread is incredible on its own, but here’s how to take it to the next level:
For Breakfast:
- Spread with cream cheese or mascarpone
- Top with a drizzle of honey
- Slather with peanut butter or almond butter
- Serve with Greek yogurt and fresh berries on the side
For Snacks:
- Butter while still slightly warm
- Pair with your afternoon coffee or tea
- Spread with Nutella for a treat
For Dessert:
- Warm and top with vanilla ice cream
- Drizzle with salted caramel sauce
- Add a dollop of whipped cream and fresh banana slices
Time-Saving Tips for Busy Bakers
Total time from start to finish: 1 hour 20 minutes
Active hands-on time: 15 minutes
See? This banana nut bread recipe is way easier than you think.
Batch prep: Toast multiple batches of walnuts at once and store them in the freezer. They’ll stay fresh for months and you’ll always have them ready.
Use a stand mixer: If you have one, use it on the lowest speed for mixing wet ingredients. Just remember to fold in the flour by hand to avoid overmixing.
Silicone loaf pan: Invest in one. Nothing sticks to silicone and cleanup is a breeze.
Mise en place: Measure everything out before you start mixing. Once you begin, the whole process takes maybe 10 minutes before it goes in the oven.
Troubleshooting Common Issues
Problem: My bread is dry
Solution: You probably overbaked it or didn’t use ripe enough bananas. Check at 50 minutes next time and make sure those bananas are covered in brown spots.
Problem: It sank in the middle
Solution: Too much baking soda, opening the oven door too early, or underbaking. Measure carefully (1 teaspoon, not 1 tablespoon!) and don’t peek before 45 minutes.
Problem: The outside is too dark but the inside is raw
Solution: Your oven runs hot. Reduce temperature to 325°F and bake longer. Also, tent with foil after 40 minutes if the top is browning too quickly.
Problem: It’s too dense
Solution: You overmixed the batter. Next time, fold more gently and stop as soon as you can’t see dry flour.
Frequently Asked Questions
Can I use frozen bananas for this banana nut bread recipe?
Yes! Thaw them completely and drain any excess liquid before mashing. Frozen bananas actually work great because they get super mushy when thawed, making them easy to mash. Just make sure to bring them to room temperature before using.
How ripe do my bananas need to be?
The riper, the better. Your bananas should be covered in brown spots, almost black. If they look like something you’d throw away, they’re perfect for banana bread. According to research from America’s Test Kitchen, overripe bananas have converted their starches into sugars, which is why they make sweeter, more flavorful bread.
Can I make this without nuts?
Absolutely. Just leave them out completely. The bread will still be delicious. You could also substitute chocolate chips, dried fruit, or leave it plain.
Why did my banana bread turn out gummy?
Usually this happens from underbaking or using too many bananas. Stick to 3 large bananas and make sure that toothpick comes out clean. If there’s any wet batter on it, keep baking.
Can I double this recipe?
Yes! Double all ingredients and use two loaf pans. The baking time stays roughly the same, though you might need a few extra minutes. Check both pans with a toothpick at 50 minutes.
What if I don’t have a 9×5 loaf pan?
You can use an 8×8 inch square pan. The bread will be thicker and might need 5-10 extra minutes of baking time. Check for doneness the same way with a toothpick.
Can I make this into muffins instead?
Definitely. Fill muffin cups about ⅔ full and bake at 350°F for 18-22 minutes. This recipe makes about 12 standard muffins. They’re perfect for grab-and-go breakfasts.
How do I keep the walnuts from sinking to the bottom?
Toss them in a tiny bit of flour (about 1 tablespoon) before folding them in. This helps them stay suspended in the batter. Also, don’t overmix once you add them.
My bread cracked on top. Did I do something wrong?
Nope! That crack down the middle is totally normal and actually desirable. It happens because the outside sets before the inside is done rising. It’s a sign of a good, high-rising loaf.
Can I reduce the sugar in this banana nut bread recipe?
Yes, you can go as low as ½ cup without majorly affecting texture. The bread won’t be as sweet, but the ripe bananas still provide natural sweetness. Below ½ cup, you might notice changes in texture and browning.
Wrapping Up
If you’ve got brown bananas on your counter right now, this is your moment.
This banana nut bread recipe is the kind you’ll make on a random Tuesday morning, bring to weekend brunches, gift to neighbors, and triple batch during the holidays.
It’s foolproof enough for beginners but impressive enough that people will ask for the recipe.
The smell alone while it’s baking is worth making it. That warm, sweet, nutty aroma that fills your kitchen and makes everyone suddenly appear asking when it’ll be ready.
And here’s what I love most: once you nail this basic version, you can make it completely your own. Chocolate chips one week, pecans the next, maybe a cream cheese swirl if you’re feeling fancy. The foundation is solid enough to handle whatever you throw at it.
I’d love to hear how yours turns out. Did you try any fun variations? Did your family devour it as fast as mine did? Any questions while you’re making it?
Drop a comment below and let me know. And if something doesn’t turn out perfect, tell me what happened. I’m here to help you troubleshoot and make the best banana bread of your life. 🍌