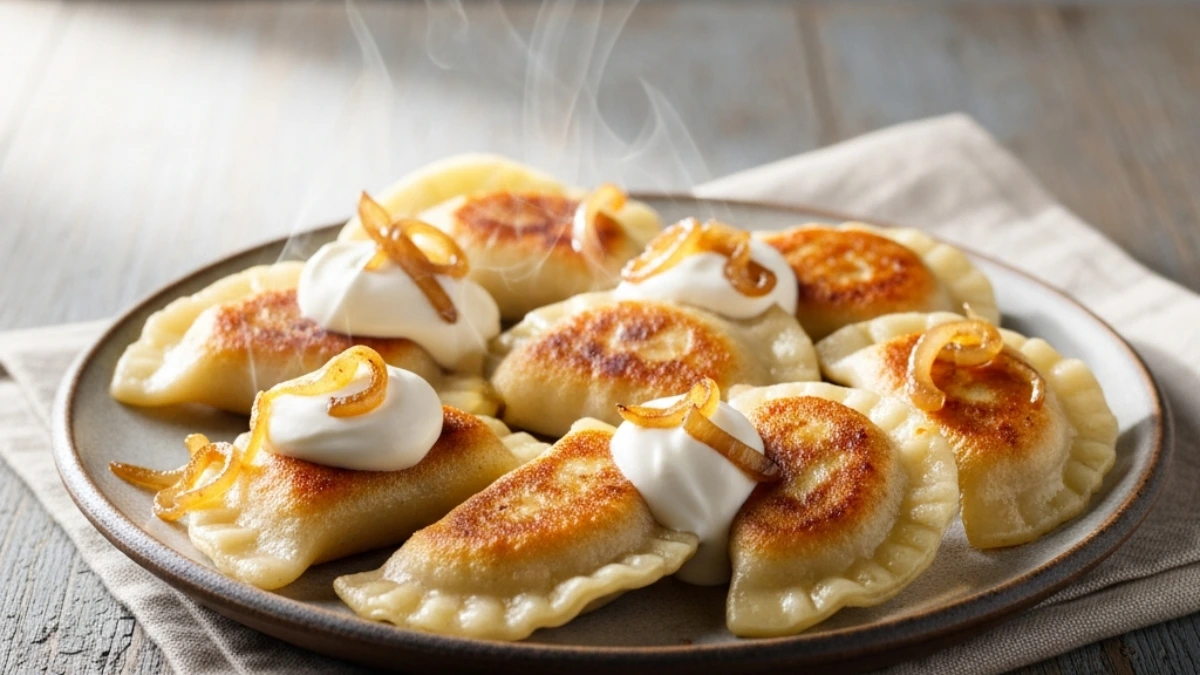
Pittsburgh pierogies — the beloved Polish-American dumplings from Western Pennsylvania — are the kind of food that turns a regular weeknight into something worth remembering.
You’ve probably grabbed a frozen bag before. You might have even liked them. But once you make Pittsburgh-style pierogies from scratch, golden and crispy in a butter and caramelized onion pan, those frozen ones are never going back in the cart. 🥟
Fun fact: Pittsburgh takes this dish so seriously that the Pittsburgh Pirates hold an actual Pierogi Race at PNC Park — costumed pierogi mascots sprinting around the bases every home game. That’s the level of love this city has for these dumplings.
The dough is simple. The filling is cheesy and satisfying. The pan-fry finish is what takes them from “pretty good” to “I made way too many and I have zero regrets.”
Keep reading — the Pro Tips section alone will save you from the most common mistakes first-timers make.
Suggested Titles for This Post
| Title | Characters |
|---|---|
| Crispy Homemade Pittsburgh Pierogies Recipe (Buttery & Golden) | 63 |
| Easy Pittsburgh Pierogies Recipe Ready in Under 2 Hours | 57 |
| Golden Pittsburgh Pierogies Recipe with Caramelized Onions | 60 |
| Buttery Pittsburgh Pierogies Recipe Better Than Store-Bought | 61 |
| 5-Ingredient Pittsburgh Pierogies Recipe — Comfort Food Classic | 64 |
What You’ll Need
For the Dough
- 3 cups all-purpose flour (plus extra for dusting)
- 1 teaspoon salt
- 1 large egg
- ¾ cup sour cream
- 2 tablespoons unsalted butter, softened
For the Potato and Cheese Filling
- 2 lbs Yukon Gold potatoes, peeled and cubed
- 1½ cups sharp cheddar cheese, shredded
- 3 tablespoons unsalted butter
- ¼ cup whole milk (warmed)
- 1 teaspoon salt
- ½ teaspoon black pepper
- ½ teaspoon garlic powder
For the Pan-Fry Finish
- 4 tablespoons unsalted butter
- 1 large yellow onion, thinly sliced
- Salt to taste
For Serving
- Sour cream
- Fresh chives or green onions, chopped
 1")
Tools You’ll Need
- Large mixing bowl
- Stand mixer or hand mixer (optional)
- Large pot (for boiling potatoes and pierogies)
- Rolling pin
- 3-inch round cookie cutter or drinking glass
- Fork (for crimping edges)
- Slotted spoon
- Large skillet or cast iron pan
- Potato masher or ricer
- Baking sheet lined with parchment paper
Pro Tips for Pittsburgh Pierogies (First-Timers, Read These)
These five tips are the difference between pierogies that hold together beautifully and a pot full of exploded dough. Learn from the mistakes so you don’t have to make them.
1. Rest the dough — no shortcuts. 30 minutes of resting relaxes the gluten and makes rolling smooth and easy. Skip it and the dough snaps back at you the whole time.
2. Cool the filling completely before stuffing. Warm filling creates steam inside the dough, which weakens the seal. Pierogies pop open in the boiling water. Cold filling = pierogies that stay intact.
3. Underfill, not overfill. It feels right to pack them full. It isn’t. A heaping teaspoon of filling per circle is all you need. Overstuffed pierogies burst.
4. Pat them dry after boiling. Before they hit the hot butter, dry them with paper towels. Wet pierogies steam. Dry pierogies fry. You want the crust.
5. Go low and slow on the onions. 20-25 minutes on medium-low heat. They go from sharp and raw to sweet, jammy, and deeply savory. This step makes the whole dish.
How to Make Pittsburgh Pierogies
Step 1: Make the Dough
In a large bowl, combine flour and salt. Make a well in the center, then add the egg, sour cream, and softened butter.
Mix until a shaggy dough forms. Turn it out onto a floured surface and knead for 5-7 minutes until smooth and slightly tacky.
Wrap in plastic wrap and rest at room temperature for at least 30 minutes. Overnight in the fridge works even better.
Step 2: Make the Filling
Boil the cubed Yukon Gold potatoes in heavily salted water for about 15 minutes, until completely fork-tender.
Drain them well — watery potatoes mean watery filling and the whole thing falls apart.
Mash while still hot. Add butter, warm milk, salt, pepper, and garlic powder. Stir smooth, then fold in the shredded cheddar.
Spread on a plate and refrigerate until completely cold — about 30-45 minutes.
Step 3: Roll and Cut
Divide the rested dough in half. Roll each half to about ⅛ inch thickness on a floured surface.
Cut circles using a 3-inch round cutter. Re-roll scraps and cut again. You should get 36-40 circles total.
Step 4: Fill and Seal
Place a heaping teaspoon of cold filling in the center of each circle.
Fold into a half-moon. Press edges firmly together with your fingers, then crimp all the way around with a fork. Check every seal. A weak crimp is a burst pierogi.
Set finished pierogies on the parchment-lined baking sheet in a single layer.
Step 5: Boil the Pierogies
Bring a large pot of salted water to a boil. Drop pierogies in batches of 8-10.
They sink first, then float. Once they float, cook 2 more minutes, then remove with a slotted spoon.
Pat dry on a paper towel-lined baking sheet.
Step 6: Caramelize the Onions
Melt 2 tablespoons of butter in a large skillet over medium-low heat. Add sliced onion with a pinch of salt.
Cook, stirring occasionally, for 20-25 minutes until golden brown and jammy. Set aside.
Step 7: Pan-Fry to Finish 🧈
In the same skillet, melt the remaining 2 tablespoons of butter over medium-high heat.
Add dry, boiled pierogies in a single layer. Pan-fry for 2-3 minutes per side until golden and crispy. Work in batches — do not crowd the pan.
Serve immediately with caramelized onions, sour cream, and fresh chives.
Substitutions and Variations
| Original Ingredient | Swap | Notes |
|---|---|---|
| Sharp cheddar | Gruyère or farmer’s cheese | More traditional Polish-style flavor |
| Yukon Gold potatoes | Russet potatoes | Slightly drier, still works great |
| Butter (pan-fry) | Olive oil or neutral oil | Dairy-free option |
| Yellow onion | Shallots | Milder and slightly sweeter |
| Sour cream in dough | Full-fat Greek yogurt | Same fat content, nearly identical result |
Filling variations worth making:
- Sauerkraut and mushroom (very traditional, deeply savory)
- Sweet potato and brown butter
- Spinach and ricotta
- Bacon, cheddar, and jalapeño
Make Ahead Tips
Uncooked pierogies freeze perfectly. Freeze flat on a parchment-lined sheet first, then transfer to a freezer bag once solid. Keeps for up to 3 months. Cook straight from frozen with 2-3 extra minutes in the boiling water.
The dough can be made up to 2 days ahead and kept refrigerated, wrapped tightly.
The filling keeps well in the fridge for 1-2 days before you’re ready to assemble.
Nutritional Information
Per 4 pierogies, pan-fried with butter and onions. Values are approximate.
| Nutrient | Per Serving (4 pierogies) |
|---|---|
| Calories | ~320 |
| Carbohydrates | 38g |
| Protein | 9g |
| Fat | 15g |
| Fiber | 2g |
| Sodium | 420mg |
Diet-Specific Swaps for Pittsburgh Pierogies
- Gluten-free: Use a 1:1 GF flour blend — expect a slightly denser texture
- Dairy-free: Coconut cream in the dough, vegan butter and dairy-free cheddar in the filling
- Higher protein: Add crumbled bacon or a soft-boiled egg yolk to the filling
Meal Pairing Suggestions
Pittsburgh pierogies are filling on their own, but they pair really well with:
- Simple green salad with a sharp vinaigrette — the acidity cuts through the richness perfectly
- Kielbasa or smoked sausage for a full Pittsburgh-style dinner
- Roasted beets or pickled vegetables — very Eastern European and very good together
- A fried egg on top for a hearty, satisfying breakfast version
Leftovers and Storage
| Storage Method | How Long | Reheating |
|---|---|---|
| Refrigerator (airtight container) | Up to 4 days | Buttered skillet, 2-3 min per side |
| Freezer — cooked (freezer bag) | Up to 2 months | Straight from frozen in a skillet |
| Freezer — uncooked (flat freeze first) | Up to 3 months | Boil from frozen, add 2-3 min |
Reheating tip: The skillet brings back the crust. The microwave doesn’t. Your call, but the skillet is always the right call.
FAQ About Pittsburgh Pierogies
Can I use store-bought dough? Refrigerated pasta dough works in a pinch, but the texture is noticeably different. The sour cream in homemade pierogi dough gives it a softness and tenderness that pasta dough can’t replicate.
Why do my Pittsburgh pierogies keep bursting open? Three culprits: warm filling, overfilling, or a weak crimp. Keep the filling cold, use just a heaping teaspoon per circle, and press and crimp the edges hard with a fork.
Do I have to pan-fry after boiling? You can eat them straight from the water — soft and tender. A lot of people love them that way. The pan-fry gives you the golden crust, which is what makes this homemade version worth the effort.
How thin should I roll the dough? About ⅛ inch. Hold a cut circle up to the light — if you can faintly see your hand through it, you’re there. Too thick and the dough overwhelms the filling.
Are pierogies Polish or Ukrainian in origin? According to food historians, pierogies (also spelled pierogi in Polish) are deeply rooted in Central and Eastern European cuisine, with strong ties to both Polish and Ukrainian culinary traditions. Pittsburgh’s version came over with Eastern European immigrants in the late 19th and early 20th centuries through the steel industry.
Is this recipe kid-friendly? Really is. Cutting dough circles, spooning in filling, and pressing edges shut are all tasks kids enjoy. A few will burst from enthusiastic overfilling. That’s just part of it.
Wrapping Up
Pittsburgh pierogies are one of those recipes that look like a project and end up being a Saturday afternoon you’ll want to repeat.
Once you get into the rhythm of rolling, filling, and crimping, it’s almost meditative. The onions caramelize and the kitchen smells incredible. And when you plate them — golden, crispy, topped with sour cream and chives — it feels genuinely earned.
Make a big batch, freeze half, and you’ll thank yourself on a Tuesday night when dinner needs to happen fast.
Drop a comment below and tell me how it went. Did you stick with the classic potato and cheddar? Try a different filling? I want to hear about it. And if any questions come up before you start, leave them below.