This Navajo fry bread recipe — known as Dah Diníilghaazh in the Diné language of the American Southwest — is proof that four ingredients can create something genuinely unforgettable.
Golden on the outside. Pillowy and chewy inside. Ready in 30 minutes.
And here’s what most people don’t know before they make it: this bread carries over 150 years of history in every bite. 👇
A Story That Makes This Bread Mean More
In 1864, the U.S. government forced the Navajo Nation on what became known as the Long Walk — a brutal 300-mile march from their homeland in Arizona to Bosque Redondo, New Mexico.
The government issued rations: white flour, salt, lard, and baking powder.
The Navajo people turned those scraps into fry bread.
It became a symbol of survival, resilience, and cultural identity — and it’s still one of the most beloved foods in Indigenous communities across the American Southwest today.
“Fry bread connects us to our history — it’s painful and it’s beautiful at the same time.” — Chrystos, Indigenous poet and activist
So yes, this is more than just a quick bread recipe. Make it with that in mind.
What You’ll Need
Dry Ingredients
- 2 cups all-purpose flour
- 1 tablespoon baking powder
- 1 teaspoon salt
Wet Ingredients
- ¾ cup warm water (not boiling — just warm to the touch)
For Frying
- 2 cups vegetable oil (or lard for a more traditional, richer flavor)
 1")
Tools Required
| Tool | Why You Need It |
|---|---|
| Large mixing bowl | Mixing and resting the dough |
| Cast iron skillet | Best heat retention for even frying |
| Kitchen thermometer | Keeping oil at exactly 375°F |
| Tongs or slotted spoon | Safe flipping without splashing |
| Paper towel-lined plate | Draining excess oil after frying |
| Measuring cups and spoons | Accurate ingredient ratios |
Cast iron is strongly recommended over a regular skillet. It holds heat more evenly, which means more consistent results from the first piece to the last.
Pro Tips
These are the details that separate good fry bread from great fry bread:
- Don’t overwork the dough. Mix it just until it comes together. Overworking it builds too much gluten and you’ll end up with tough, dense bread instead of light and airy.
- Oil temperature is everything. Aim for 375°F. Below that, the bread absorbs oil and gets greasy. Above it, the outside browns before the inside cooks through.
- Stretch it thin in the center. The middle should be thinner than the edges so it cooks evenly and puffs up properly.
- Poke a small hole in the center before it goes in the oil. This prevents uneven ballooning and helps the bread cook flat.
- Fry one piece at a time while you’re learning. Adding multiple pieces drops the oil temperature and affects the texture of everything in the pan.
How to Make Navajo Fry Bread
Step 1: Mix the Dough
Combine flour, baking powder, and salt in a large bowl. Add the warm water gradually, mixing with your hands until a soft dough forms.
It should be soft but not sticky. Don’t add extra water unless it absolutely won’t come together.
Step 2: Rest the Dough
Cover the bowl with a clean kitchen towel and let the dough rest for 10 minutes.
This step relaxes the gluten and makes the dough significantly easier to stretch and shape. Don’t skip it.
Step 3: Heat the Oil
Pour oil into your cast iron skillet to about 1 inch deep. Heat over medium-high until it reaches 375°F.
No thermometer? Drop a tiny pinch of dough in the oil — it should sizzle immediately and float straight to the surface.
Step 4: Shape Each Piece
Pinch off a piece of dough roughly the size of a lemon. On a lightly floured surface, stretch or flatten it with your hands into a round disc about 6-7 inches wide.
Make the center thinner than the edges. Then poke one small hole through the center with your finger.
Step 5: Fry
Carefully lower the shaped dough into the hot oil. Fry for 2-3 minutes per side until deep golden brown and crispy at the edges.
Remove with tongs and place on a paper towel-lined plate to drain. Repeat with remaining dough.
Step 6: Serve Hot
Fry bread is at its absolute peak the moment it comes out of the oil. Top it and eat it immediately.
How to Serve Navajo Fry Bread
This is where the fun really starts. 🙌
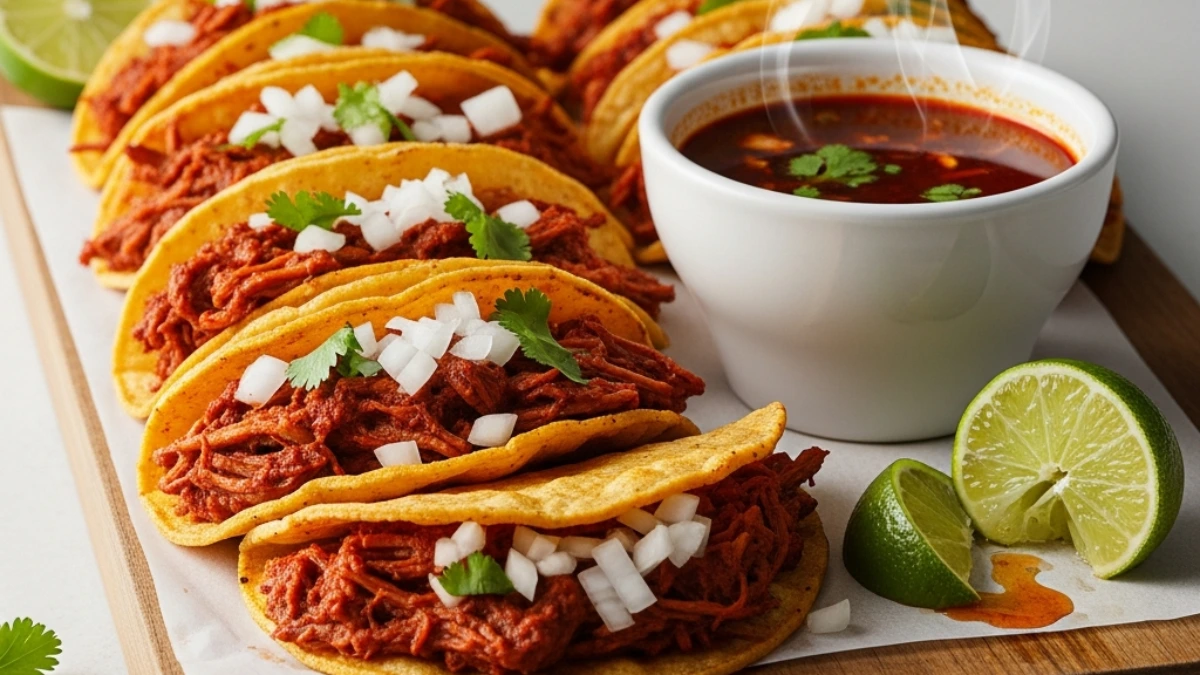
Savory: Navajo Tacos (Indian Tacos) Top with seasoned ground beef or pinto beans, shredded cheddar, shredded lettuce, diced tomato, sour cream, and green chili. This is the most popular way to serve fry bread and it’s genuinely one of the most satisfying meals you’ll ever make.
Sweet: Honey Butter Drizzle with honey and dust with powdered sugar. Simple, warm, and completely irresistible.
Just Plain with Butter Honestly? Fresh out of the oil with a pat of butter is hard to beat.
Substitutions and Variations
| Original Ingredient | Swap | Result |
|---|---|---|
| All-purpose flour | Bread flour | Slightly chewier texture |
| Vegetable oil | Lard | Richer, more traditional flavor |
| Water | Warm whole milk | Softer, richer dough |
| Regular salt | Garlic salt | Subtle savory depth |
| Standard recipe | Gluten-free 1:1 flour blend | More delicate, similar flavor |
Air fryer version: Cook at 375°F for 6-8 minutes, flipping halfway. Fair warning — the texture won’t match the deep-fried version. The exterior stays softer rather than crisping up properly.
For a deep dive into the nutritional and cultural context of fry bread and Indigenous foods, Serious Eats has an excellent resource worth reading.
Make Ahead Tips
- Dough: Make up to 24 hours ahead and refrigerate covered. Let it come back to room temperature for 20-30 minutes before shaping.
- Shaped rounds: Freeze between layers of parchment paper for up to 1 month. Thaw overnight in the fridge before frying.
- Fried bread: Best made fresh, but can be reheated (see storage section below).
Nutritional Breakdown (Per Piece, Plain)
| Nutrient | Per Serving |
|---|---|
| Calories | ~330 |
| Carbohydrates | 40g |
| Fat | 16g |
| Protein | 5g |
| Sodium | 390mg |
| Fiber | 1g |
Values vary based on oil absorption and toppings added.
Dietary swaps:
- Lower fat: Use less oil and air fry instead
- Higher protein: Top with black beans and cheese for Navajo tacos
- Dairy-free: Skip any butter or dairy toppings — the base recipe is already dairy-free
Leftovers and Storage
Fry bread is honestly best eaten right out of the pan.
That said:
- Room temperature: Store in an airtight container for up to 2 days
- Reheating: 400°F oven for 5-8 minutes, or air fryer for 3-4 minutes
- Avoid the microwave if you want any crispiness left — it softens the whole thing
- Cool on a wire rack before stacking — steam from stacking hot pieces makes them go soggy fast
FAQ
Can I bake this instead of frying it?
Technically yes, but it won’t taste or feel like fry bread. Frying is what creates the signature puffed, crispy, golden exterior. Baking produces something closer to a flatbread.
Why did my fry bread turn out tough?
Almost always one of two reasons: the dough was overworked, or it didn’t rest long enough. Be gentle when mixing and give it the full 10-minute rest.
Why is mine coming out greasy?
The oil wasn’t hot enough. When frying below 375°F, the bread absorbs oil instead of immediately crisping up. Use a thermometer and don’t rush the preheating.
Can I use self-rising flour?
Yes — skip the baking powder and salt since self-rising flour already contains both.
Is Navajo fry bread the same as sopapillas?
Similar but different. Sopapillas are typically smaller, use yeast, and puff up more dramatically. Fry bread is simpler, flatter, and has a chewier bite.
What oil works best?
Vegetable oil, canola oil, or lard. Avoid olive oil — its smoke point is too low for frying and it will burn before your oil gets hot enough.
Can I make this with kids?
Absolutely — the mixing and shaping steps are great for kids. Just handle the frying yourself and keep little hands well away from the hot oil.
Wrapping Up
Making Navajo fry bread at home is one of those cooking moments that genuinely catches you off guard.
Four ingredients. Thirty minutes. And somehow, the result is something that feels like it’s been passed down through generations — because it has.
You’ll fry your first piece, take one bite while it’s still hot, and completely get it.
Give it a try this week and come back to leave a comment below. Tell me how you topped yours, what worked, what didn’t, or any questions you ran into along the way. I read every single one and love hearing how it goes.